Thursday, March 24, 2011

This week I found a great blog called All Things Thrify. I love blogs that help you come up with great design ideas that don't take a lot of money. Whenever I redid my bedroom, I didn't have to buy any new furniture, just decorations, because I used what I had, and lots of spray paint. That's what the girl in this blog does a lot. The cutest thing I thought she did was this day bed out of old doors!

Thursday, March 17, 2011

Hand Drafting

Instead of posting something about an inspirational blog I found this week, I wanted to blog about the hand drafted floor plan I did for class. Is it weird that I kind of missed hand drafting? Something about creating something with my own two hands really excites me, and I'm getting so much better at it. I remember my first quarter here in drafting 1 and how scary it was, and now it's really easy to me. Drafting my own ideas was really awesome too. Being able to choose what I was going to draft instead of looking off of something else was really cool. It took me a long time to draft the two copies I made, but I was really able to enjoy it this time.

Thursday, March 10, 2011

DIY Sunburst Mirror

This week I found another cute do it yourself idea for a sunburst mirror. All you need is poster board and a small round mirror to make it.


Saturday, February 19, 2011

Bird cages

A few weeks ago I ordered some birdcages from an online craft store and they finally came in yesterday! They're so cute and I got all three of them for $35! The website I got them from has a lot of really cute stuff to use for decoration and it's really cheap. Here's the website:

http://www.save-on-crafts.com/

But anyways, the birdcages were adorable and I love it when they're used for decoration. This is what I did with mine:


Everyone that's seen them has loved them!

Wednesday, February 16, 2011

I found a blog again on tumblr this week that I really love. She just posts pictures of simplistic and beautiful apartments that she finds inspirational, which I also find very inspirational. I love seeing interiors that I could afford to do myself.


Thursday, February 10, 2011

Kitchen Research

This week I went to the Home Depot down the street from my house to check out all of the kitchen stuff they have. I was really surprised with all of the storage options they had! Maybe it's because my house was built in the 80's so I'm still getting used to all of the new things out there. One of my favorite things about the cabinets was that nearly all of them had wine racks! That's the one thing my kitchen is going to have to have. Here's a few pictures of the cool stuff I found:


Rotating cabinets! How awesome.


I almost didn't see this one. It's a little hidden corner cabinet.

- Posted using BlogPress from my iPhone

Wednesday, February 9, 2011


One of my favorite parts about designing and decorating is being able to make something yourself. Especially if it's making something really beautiful out of just a few, cheap materials. I was fumbling around the internet today and I found this and I think I'm going to try it to make a homemade lamp in my room!


What you will need are: balloons, glue, yarn, tray for glue, corn starch 1/2 cup of Corn starch, 1/4 cup of Warm water, clear fast drying spray paint, hanging lamp cord or fishing line (depending on your desired final product), and a lighting kit if you’re looking for a fully functional lantern. Jessica recommends using a sharpie to mark on the inflated balloon how much room you need to leave for the lighting cord. She also recommends coating the balloon with vaseline prior to wrapping the yarn coated with glue so it doesn’t stick on the balloon once it’s dry.

Instructions:

1. Inflate the balloon to a medium size so the shape is a little rounder.
2. If you’re looking to make a lampshade out of the string chandelier, use a sharpie to mark around the knot on the balloon.
3. Before you start working, we recommend using a tarp.Mix corn starch, glue and warm water together until it has a smooth texture.
5. Smear the vaseline all over your balloon until it is completely coated so th twine wet with glue won’t stick on the balloon after dry.
6. You can start a little assembly line with friends by one of you feeding the yarn through the glue mix and giving to another person to wrap it around the balloon.
7. Start wrapping the balloon vertically, slowly changing to wrapping. For a seamless look, tuck the ends of the twine under one of the wrapped strings.
8. Wait 24 hours until the balloon has completely dried before popping the balloon.
9. Spray the string chandeliers with clear fast drying spray paint et voila!
http://ruffledblog.com/diy-string-wedding-chandelier/

Wednesday, January 26, 2011

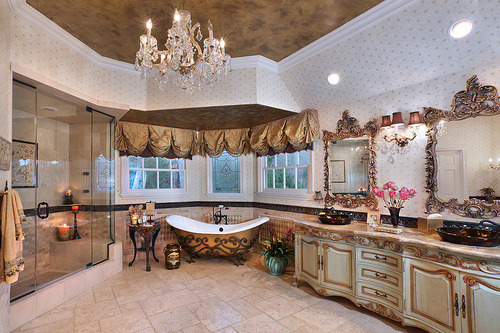
Bathroom Inspiration


I recently made a personal blog and started following a few design blogs on there. This is my favorite one:

http://interiordecline.tumblr.com/

She posts the cutest things all the time, one of which was this bathroom that I'm completely in love with. I love elegant and I love chandeliers. I would absolutely love to have this bathroom. And I love that this style is becoming so popular again because I love antiques and old fashioned things. I think they're absolutely adorable. I go antiquing almost every weekend! I hope that some day I'm able to design something as beautiful as this.